

How to Clone Git Repository in Eclipse
How to Clone Git Repository in Eclipse
This tutorial describes the usage of the Eclipse IDE to perform Git operations.
1. Git support for Eclipse
Via the Eclipse IDE you can perform Git commands like staging, commit, merge, rebase, pull and push.
2. Installation of Git back up into Eclipse
Most Eclipse IDE distributions from Eclipse.org already contain support for Git. In this case no additional installation is required.
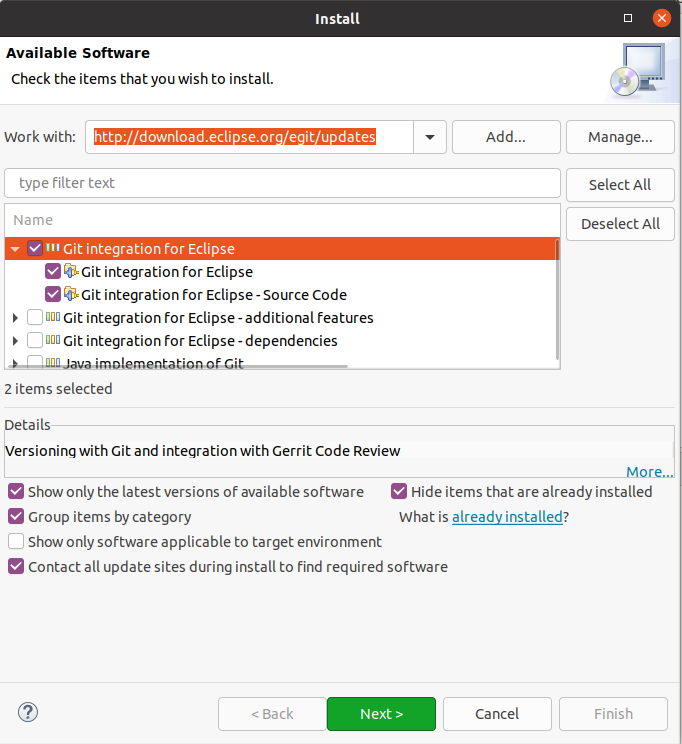
If the Git tooling is not available, you tin install it via the Eclipse installation managing director. Select the menu entry. Enter one of the following update site URLs:
# Utilise this update site to get the latest release http://download.eclipse.org/egit/updates # use this update site to become the night build http://download.eclipse.org/egit/updates-nightly/ The dialog to install the Eclipse Git team provider is depicted in the following screenshot.
3. Configuration for Git usage via the Eclipse IDE
| Interoperability of Git command line settings with the Eclipse IDE If you have already configured Git for the command line, no additional setup is required in the Eclipse IDE and you lot can skip this practise. The Eclipse IDE uses the same configuration files equally the Git command line tools. This makes information technology easier to use the Eclipse Git tooling and the control line tooling for Git interchangeable. |
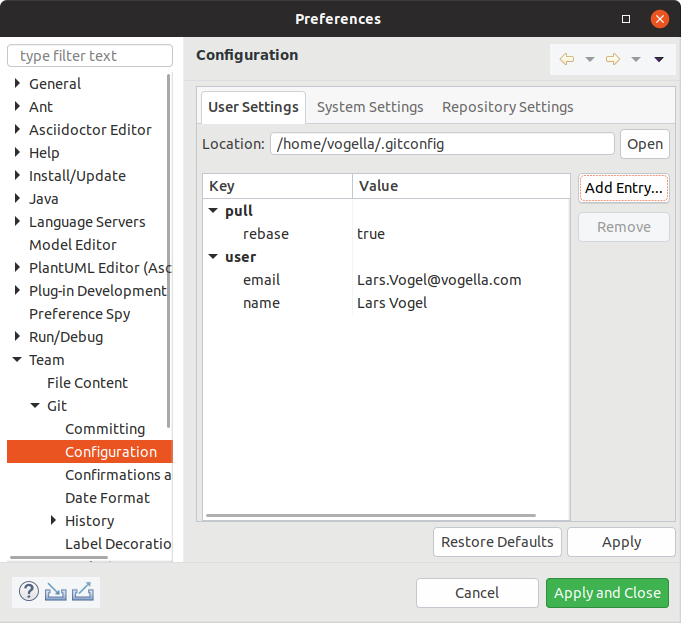
3.ane. Configure user and electronic mail
In your Eclipse IDE, select the entry. Configure your full proper noun and electronic mail in the user settings. Equally the Eclipse IDE uses the same settings as the Git command line, this might already be done.
For the user the user.proper noun key is used, for the email the user.email key is used.
If these keys are not bachelor printing the Add Entry… button and add them.
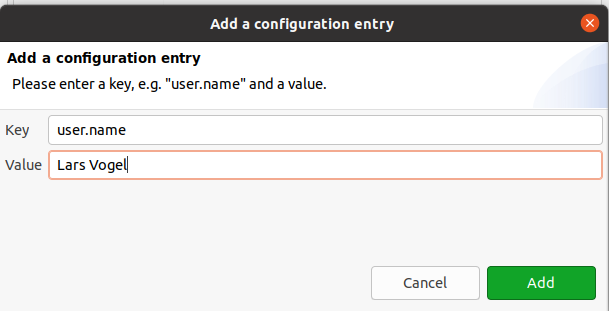
Repeat the procedure for your email accost via the user.email key.
three.two. Configure Git to rebase during pull operations
To utilize rebase during the pull performance set the pull.rebase parameter to true. It avoids merge commits if you pull from a remote repository and have divergent changes and instead rebases your local branch on the remote branch it tracks.
This is recommended setting by the author of this text.
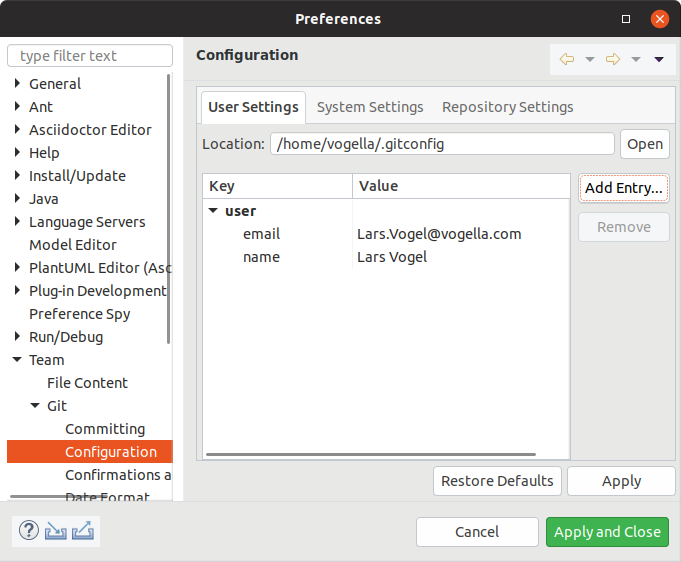
3.3. Validate the setup
After this setup, the configuration should look similar to the following screenshot.
3.4. Configuring the proxy settings
If you are using a proxy server, you can configure it via .
4. Practice: Working with Git repository in Eclipse
The post-obit exercise explains how to utilise the Eclipse IDE to perform Git operations. To ensure that you take a Git repository, yous first create a new local Git repository via the Eclipse IDE.
| The Eclipse workspace and Git repositories It is skilful practice to place your Git repositories outside the Eclipse workspace. This separates your Git repository from whatsoever additional meta-data which Eclipse might create. By default, Eclipse Git uses the git folder in the users dwelling directory to clone new repositories. |
4.1. Create a new Git repository via Eclipse
Open the Git Repositories view via the bill of fare entry. From the toolbar, select the Create a new Git repository and add together it to this view entry.

This opens a dialog which allows you lot to specify the directory for the new Git repository. Select a new directory outside of your workspace. By convention, this directory is a subdirectory in the git folder of the users home directory.
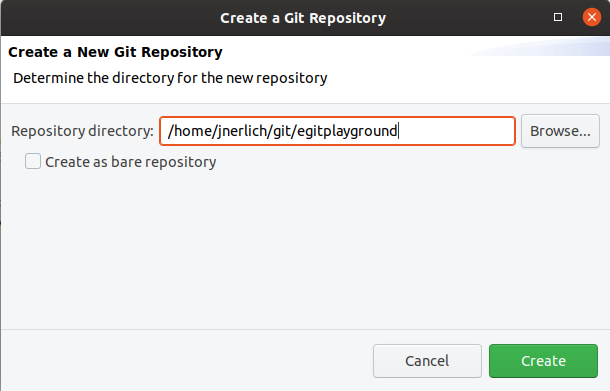
Printing the Create push button. Now the Git repository is created and a reference to it is added to the Git Repositories view.

four.2. Create .gitignore file
We want to ignore sure file types in our Git repository. We want Git to ignore the bin binder and *.class files.
Create a .gitignore file in the acme-level folder of your Git repository. This ways, the file should exist placed at the aforementioned level equally the .git directory.
Eclipse Git does not let to create a file straight in the peak-level folder of your repository. You accept to exercise this step exterior of the Eclipse IDE, either via the command line or via your system project explorer.
Information technology should contain the post-obit content.
| Recent versions of MS Windows decided to prevent y'all from renaming a file in the file explorer without using a file extension. Create a file in Notepad or Editor (new proper noun for Notepad) and select Save-Equally. Ensure you take removed the .txt extension. |
4.3. Create a new projection
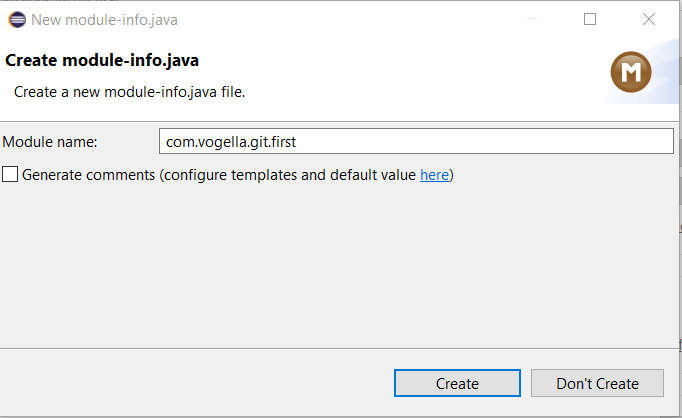
Create a new Java project called com.vogella.git.starting time via the menu entry.

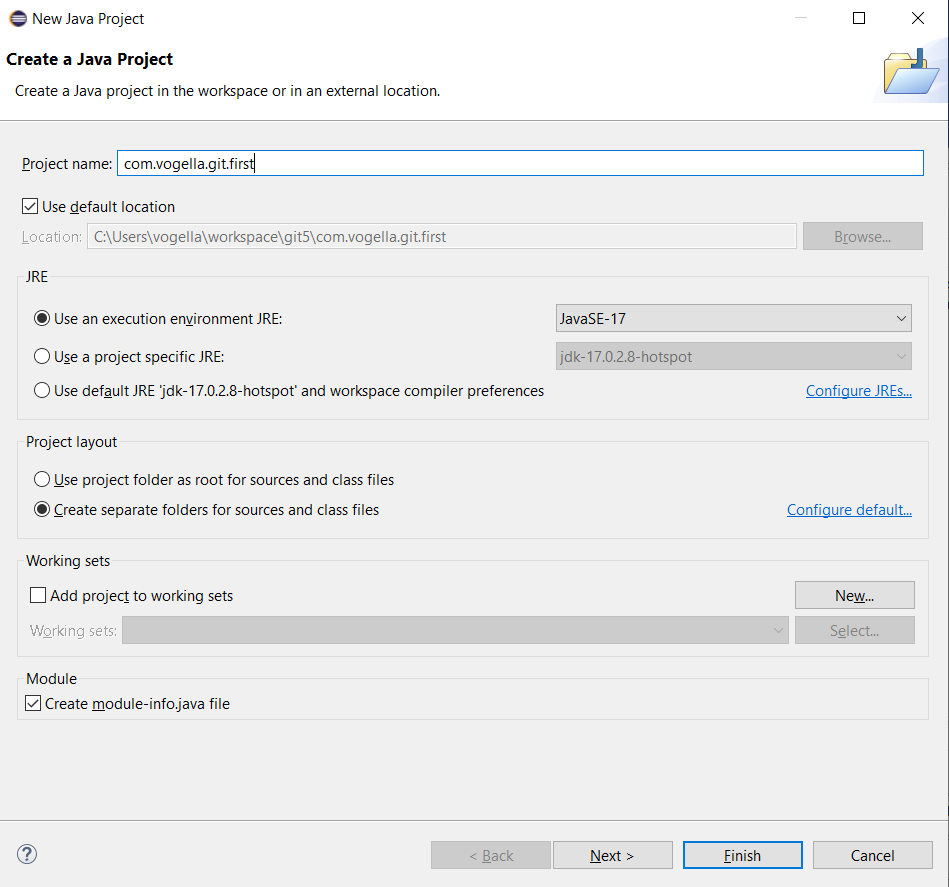
| If you are using Java ix or higher, you lot will exist asked to create a module-info.coffee. The following dialog is non shown if yous use Java 8 or lower. |
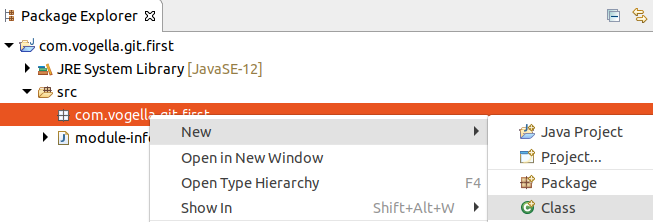
Correct-click on the source folder and select and create the com.vogella.git.kickoff package.
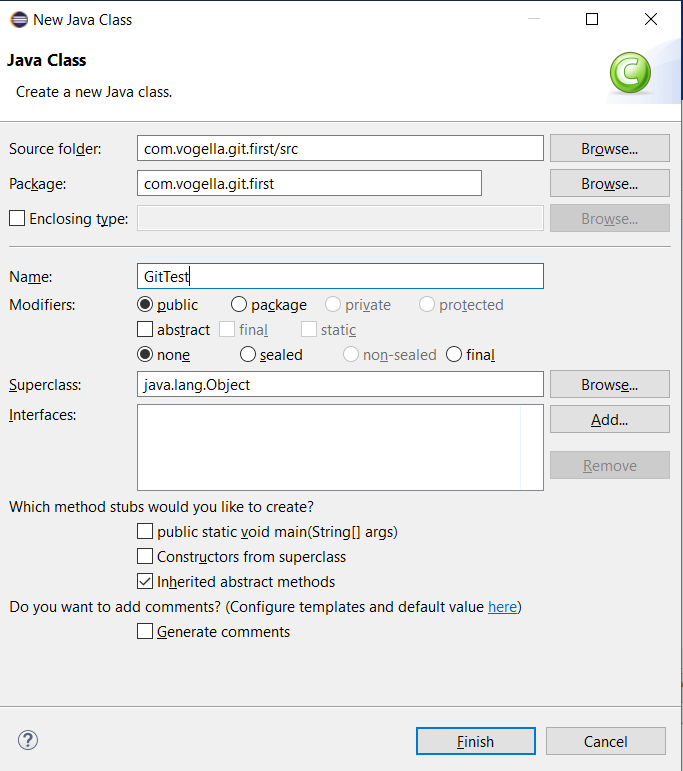
Right-click on the package binder and select and create the post-obit class.
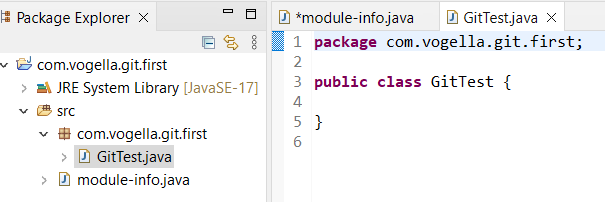
packet com.vogella.git.beginning ; public form GitTest { public static void main ( String [] args ) { Organization . out . println ( "Git is fun" ); } } 4.four. Put project under Git version control
To put your new projection under version control with Git, correct-click on your project, select .
| If some other version control system is installed you take to select that you want to use Git equally a version control system. |

Later, select your existing Git repository from the drop-down list and press the Finish push button.
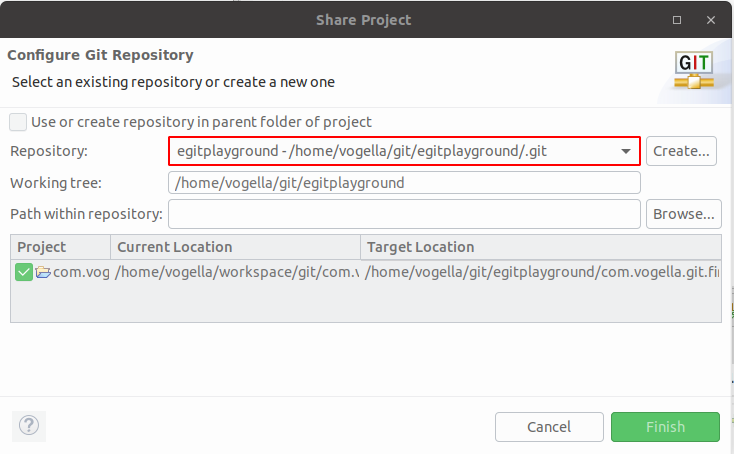
Printing the Finish push button. Your projection is now moved to your Git repository.
The following screenshot shows the directory in the Git Repository view. The .git directory contains the Git repository, the other directories contain the files of the working tree.

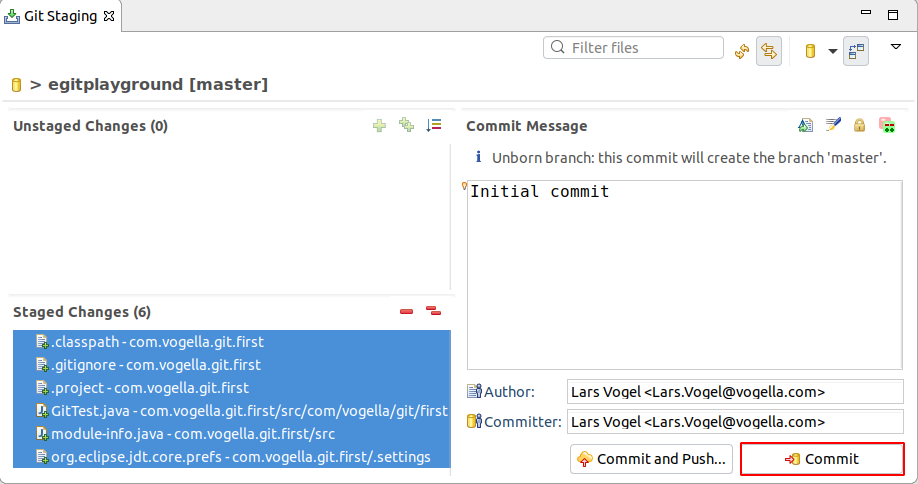
4.v. Using the Git Staging view for the initial commit
Open up the Git Staging view, via . In this view drag all files into the Staged Changes expanse, write a meaningful commit message and press the commit push.
4.half dozen. Change a file and commit the change
Change the System.out.println message in your GitTest form.
package com.vogella.git.kickoff ; public class GitTest { public static void main ( String [] args ) { Organisation . out . println ( "Git is absurd" ); } } Too create a new file called Readme.adoc.
Commit the changes of the GitTest course simply practise not add and commit the Readme.adoc file to the Git repository.
In the Git Staging view drag just the GitTest class into the Staged Changes area, write a meaningful commit message and printing the commit button.
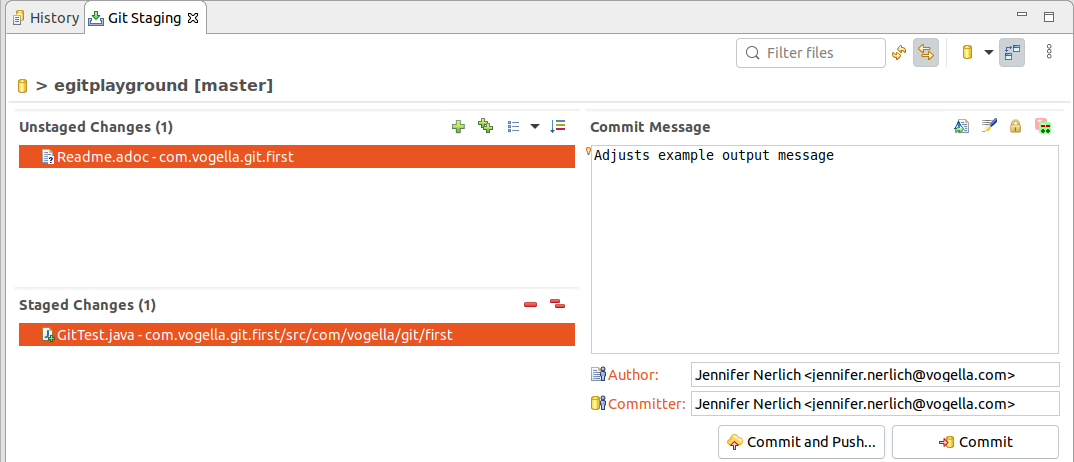
This change is now also stored in your local Git repository. The Readme.adoc file is neither staged nor committed to the Git repository.
four.7. Commit more files
Commit the Readme.adoc file. By now you should know that you accept to stage the file and commit it.
4.8. Configure the History view
Open the History view via the bill of fare entry.
In the History view click all toggle buttons as shown in the screenshot
-
Link with Editor and Selection
-
Show all changes in repository containing the selected resource
-
Show all Branches and Tags
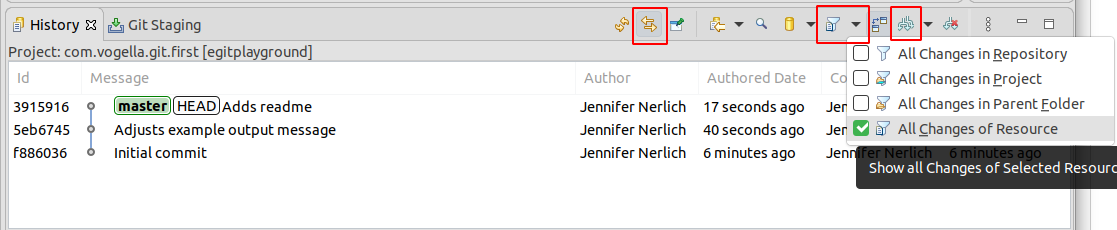
Afterwards, use the History view to review which files were included in your individual commits.
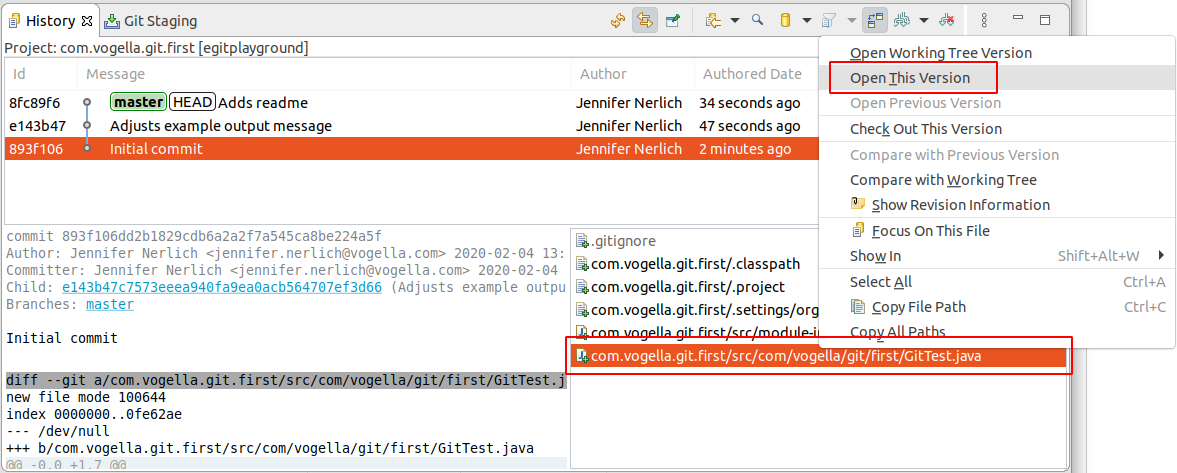
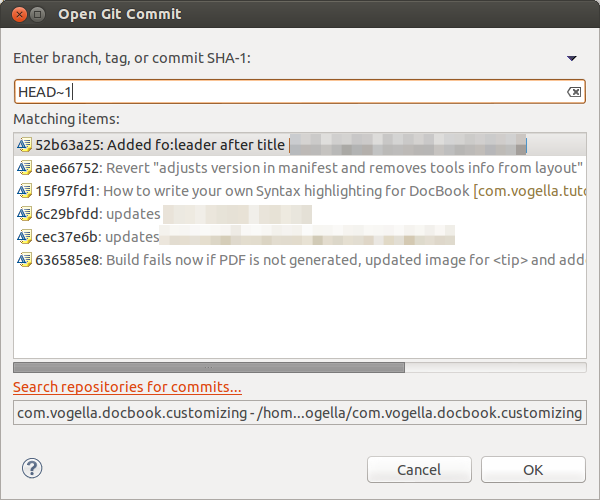
4.9. Open an older version with the current version of a file via the History view
We want to see the version of the GitTest.java file as it was in the outset commit. Select the first commit in the history view, detect the file selected in the commit and select via the context menu.
four.10. Accidently add a unwanted file an remove it
Create a new file nammed test.unwanted via right mouse click on your projection and New → File from the context menu. Phase and commit the new file.
At present add *.unwanted information technology to your .gitignore file. Make a change to your test.unwanted file
Git shows it equally change, equally changes in .gitignore only apply to new files Yous demand to untrack the file.
Select the file and select Team → Untrack (or Team → Advanced → Untrack on latest Git support for Eclipse).
Phase and commit the change.
4.11. Add more projects to your Git repository
Yous can of course have multiple projects in a Git repository. To validate that, create two more Java projects called com.vogella.egit.multi.java1 and com.vogella.egit.multi.java2. Create at least one Coffee class in each project.
Afterwards select the new projects, correct-click on them and select .
Select your Git repository in the following dialog and add both projects to this repository. Press the Finish button.
4.12. Validate the project move and commit changes
Afterwards validate that the projects take been moved. You lot can checking your workspace directory and your Git repository directory via a file explorer. You see that the projects accept been moved from there original location to the Git repository.
The changes have not however been committed. At present commit all files in the two projects to your Git repository.
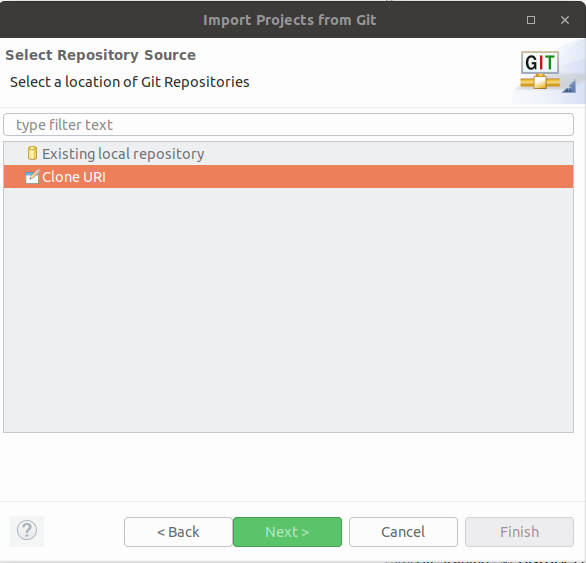
5. Practise: Clone an existing repository
In this practise you lot will clone a Git repository and import the existing projects from this repository into your workspace.
For this, select .
Select Clone URI in the side by side dialog.
Enter the URL to your Git repository which you want to clone. You lot tin can use the following example URI.
git://github.com/vogella/eclipse4book.git
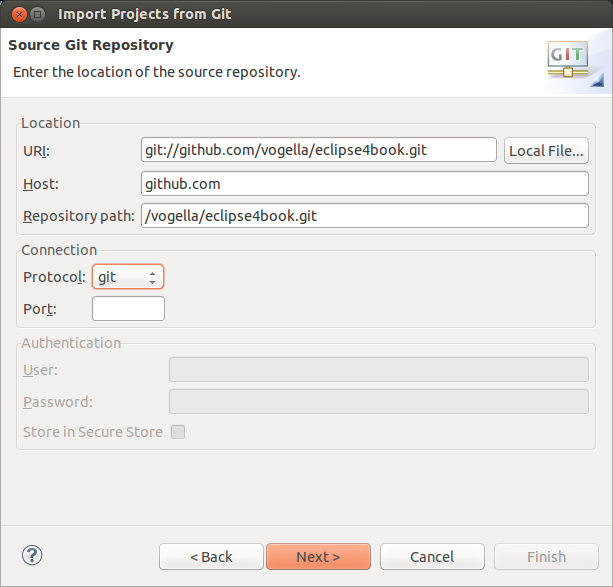
| Git supports several protocols, e.g. git://, ssh:// and https://. Y'all can paste the clone URL to the get-go line of the dialog, the rest of the dialog is filled based on this information. Some proxy servers block the git:// and ssh:// prThe in a higher place link uses the git protocol, alternatively you can also use the http protocol: http://github.com/vogella/eclipse4book.gitotocols. If you lot face issues, please try to apply the https:// or http:// protocol. |
After pressing the Adjacent button the arrangement will allow you lot to import the existing branches. Select at to the lowest degree the primary co-operative.

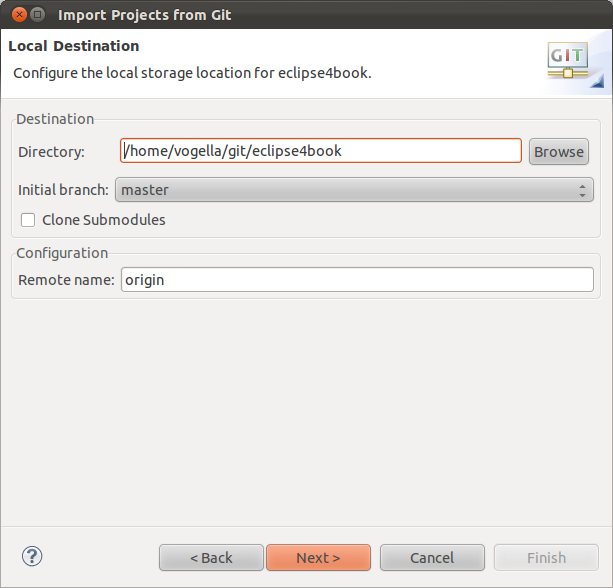
The next dialog allows you to specify where the repository should be copied to and which local co-operative should be created initially.
After the Git repository is cloned, you can import existing projects.
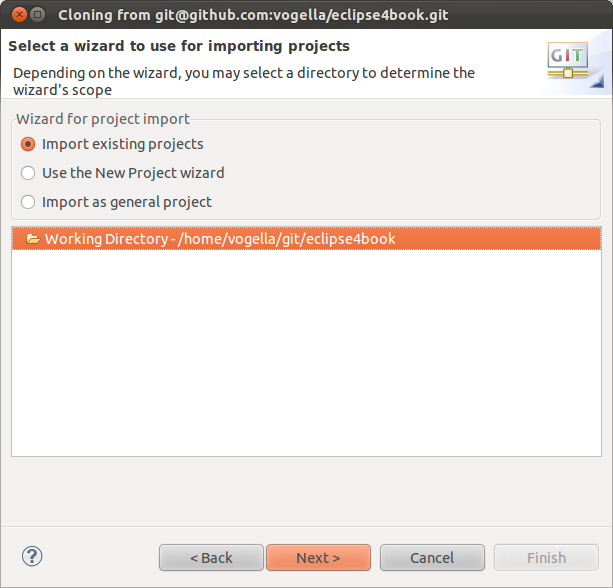
Once this dialog is completed, you take clone the remote repository into a local Git repository. Yous can use Git operation on these projects.
| The project may not compile, as you may miss pre-requisites. For this exercises, this tin exist ignored, the purpose of it was to larn how to clone a repository. |
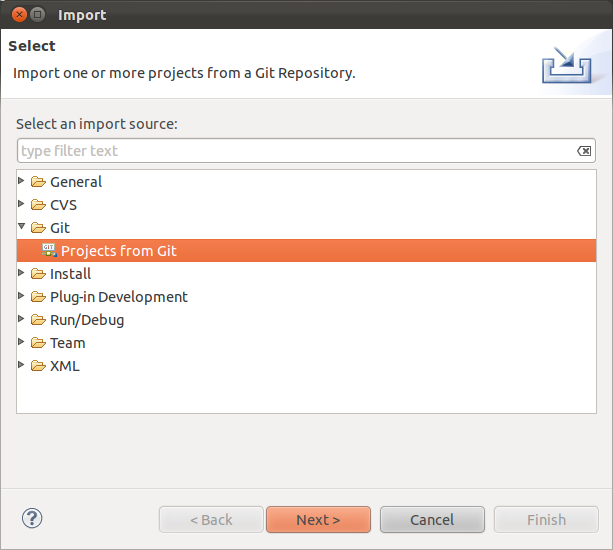
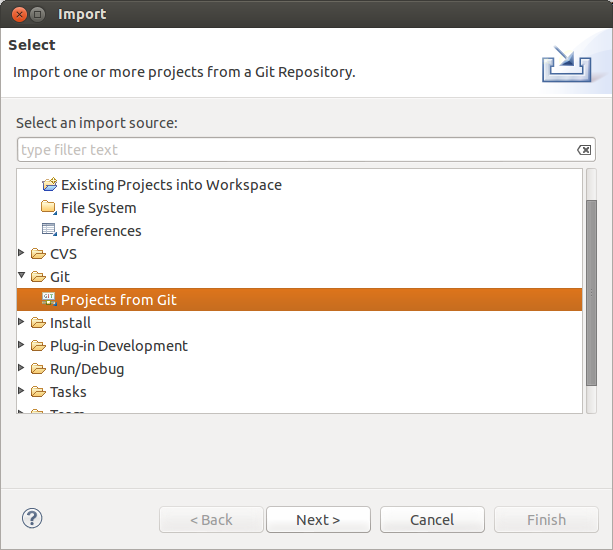
6. Practice: Import projects from an existing repository
If you accept already an existing Git repository you tin can add it to the Git Repostory view. Afterwards you can import the projects into your workspace via the menu entry.
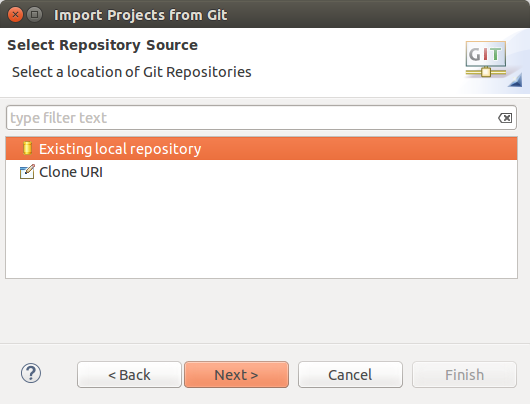
Select Local if y'all desire to important from a local repository or Clone URL if you first desire to clone the repository.
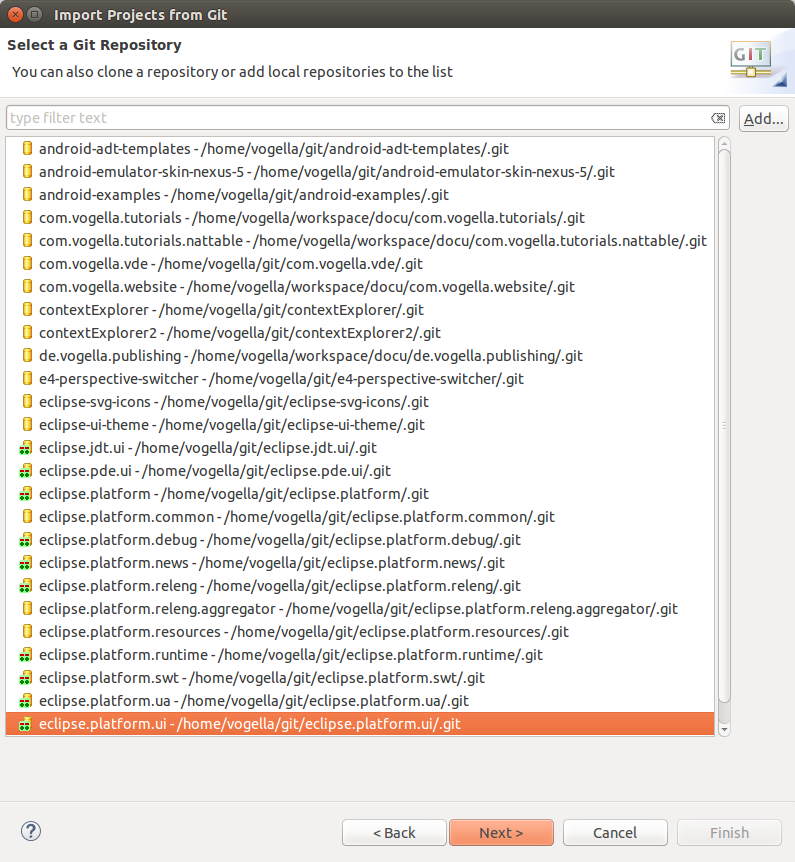
The following screenshot shows multiple local repositories. To import the projection independent in one of them, select one entries and press the Adjacent push button. To add a new local repository to this dialog (and the Git repositories view) use the Add… button.
The magician allows you to specify the projects to import. After the import the Eclipse IDE is aware that these projects are part of a Git repository.
vii. Exercise: Using interactive rebase in Eclipse
Git allows to adjust the local commit history via the interactive rebase functionality. Eclipse provides support for simplified versions of this besides as support for full interactive rebase operations. This includes changing the order of commits or combining, removing and adjusting commits.
vii.1. Simple interactive rebase operations available via the History view
To reword a commit, correct-click on information technology in the History view and select to alter the commit message.
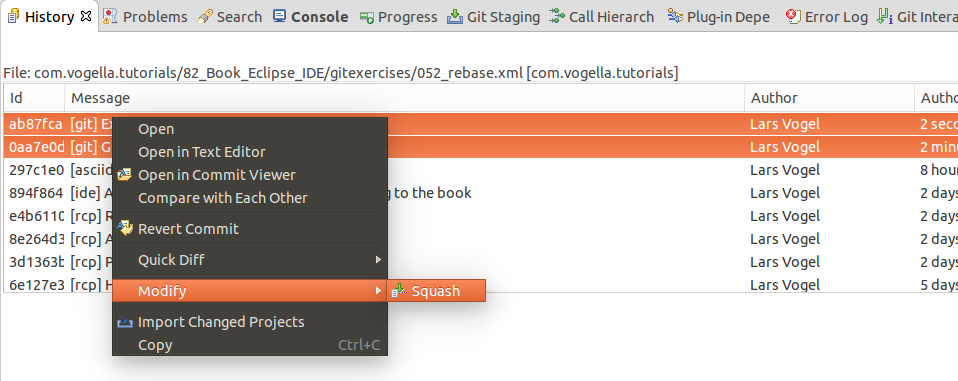
You can squash several commits past selecting them in the History view. Select afterwards the menu entry from the context bill of fare.
The in a higher place options are simplified ways to do an interactive rebase.
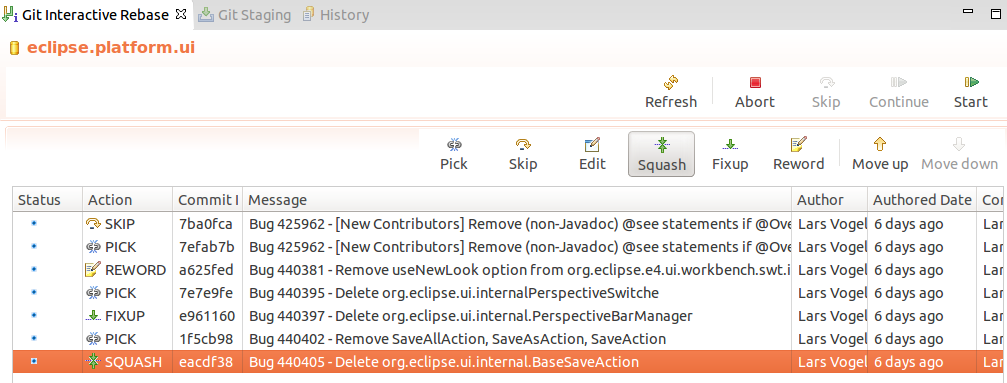
7.2. Performing a full interactive rebase via Eclipse
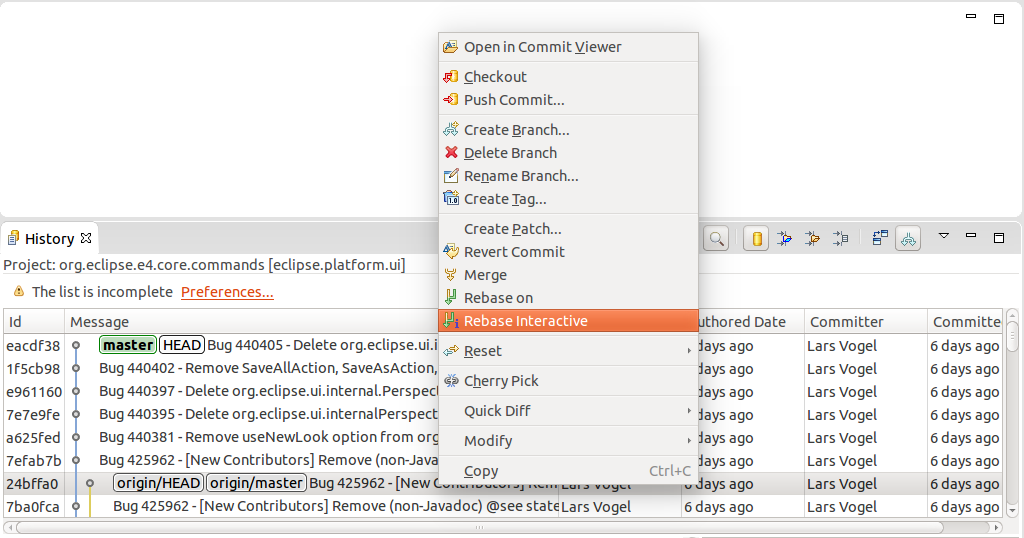
To start the full interactive rebase open the History view and click on the context menu. Select the last commit preceding the oldest commit you want to rewrite. Often this is the 1 origin/primary points to.
This opens the Git Interactive Rebase view. The Git Interactive Rebase view allow you perform the full interactive rebase functionality.
It shows the rebase plan populated with the commits to be modified. They are sorted in topological guild of the sequence in which they will be processed. This order is the opposite order which you run into via the git log command or in the History view. The initial activeness for all commits is "Pick".
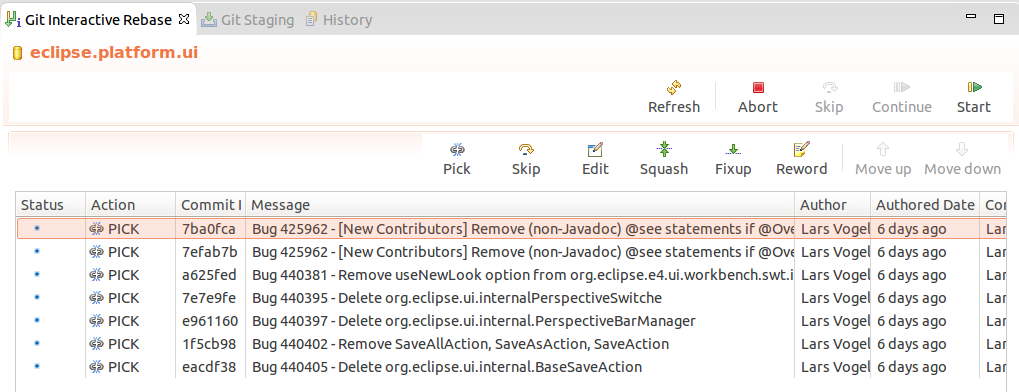
The following actions are available.
| Action | Description |
|---|---|
| pick | includes the selected commit, moving pick entries enables reordering of commits |
| skip | removes a commit |
| edit | amends the commit |
| squash | combines the changes of the commit with the previous commit and combines their commit messages |
| fixup | squashes the changes of a commit into the previous commit discarding the squashed commit'southward message |
| reword | similar to pick only allows modifying the commit message |
Utilise this view to finalize the rebase plan. For case, you can reorder commits with the pointer buttons and select the rebase action you want to apply to the commit. The following screenshot demonstrates a possible selection.
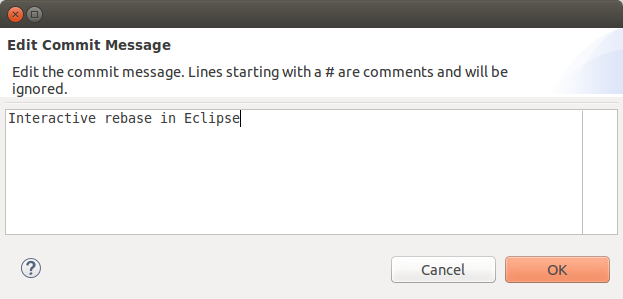
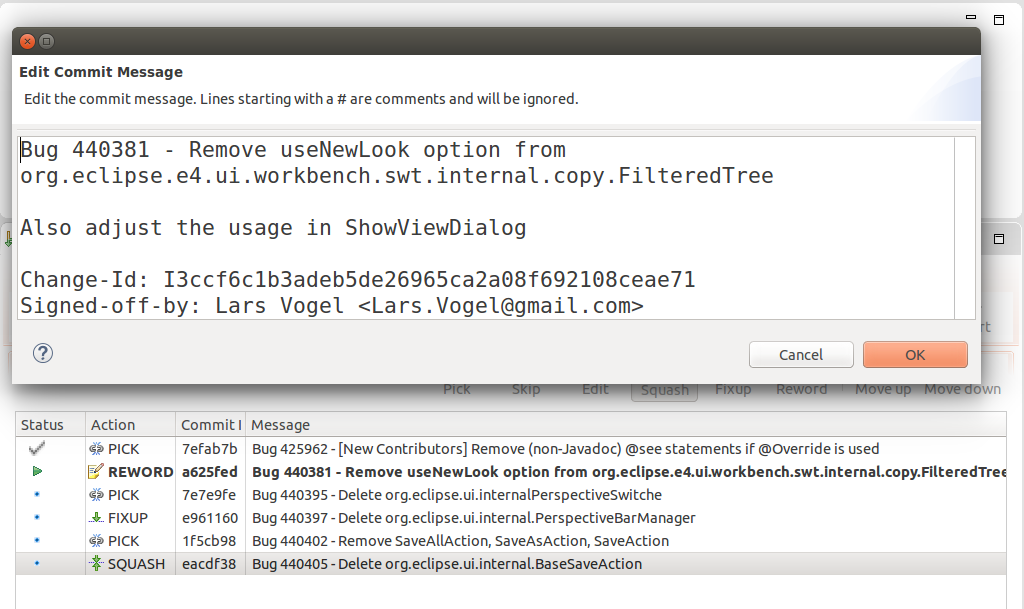
When the rebase program is finalized, click the Start button to start the interactive rebase command. Eclipse Git processes the plan. It stops at all commits with an action which needs user feedback. For example, the reword activeness which requires inbound the new commit message. The dialog for changing the commit message is depicted in the following screenshot.
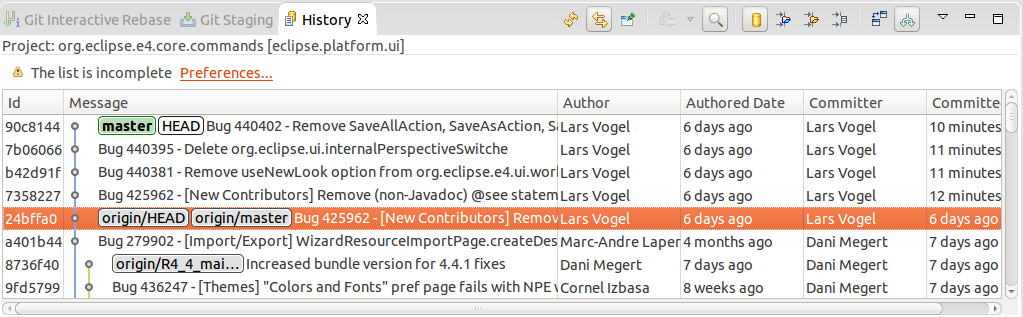
Hither is the result of the rebase functioning displayed in the History view.
| If something goes wrong during the rebase functioning, you can select Abort in order to end the rebase operation and curl back to the starting signal. |
8. Eclipse Git configuration
The Eclipse IDE uses the default Git settings, e.g. washed via the command line tooling. Y'all tin too utilize the Eclipse IDE to configure these options.
8.1. Git user settings in Eclipse
To use Git you must configure your full name and electronic mail address. This information is used to fill up the author and committer information of commits you lot create. These Git configuration settings can exist adjusted via the Eclipse preference setting. Select to see the electric current configuration and to modify information technology.
8.2. Default clone location
If you clone a new repository via the Eclipse IDE, it will be cloned past default to a new sub-folder in a default directory. This default path tin exist configured via the entry in the Default Repository folder field.
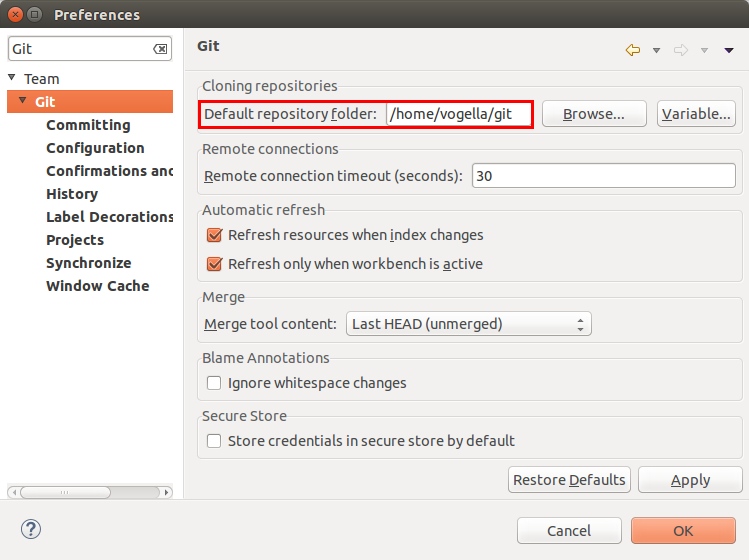
| You can too utilise Eclipse configuration variables to define the path, e.g., if you want to store repositories in the binder "git" under the Eclipse workspace you may utilize ${workspace_loc}/git. |
8.3. Configuring the toolbar and the menu for Git usage
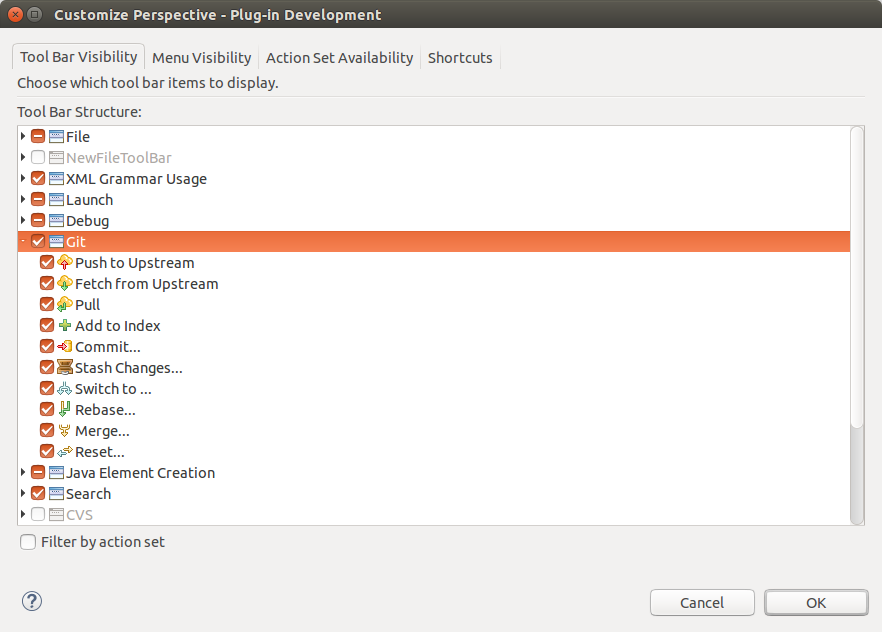
To simplify access to the common Git operations y'all can activate the Git toolbar. For this select and check the Git and Git Navigation Actions entries in the Activity Ready Availability tab.
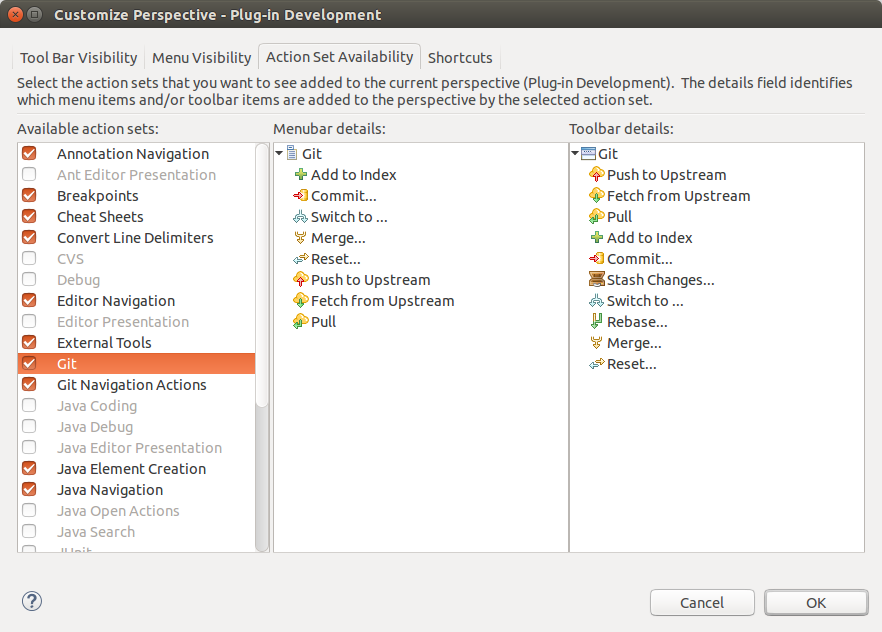
Later you can configure which Git operations should be available via the Tool Bar Visibility or the Menu Visibility tab.
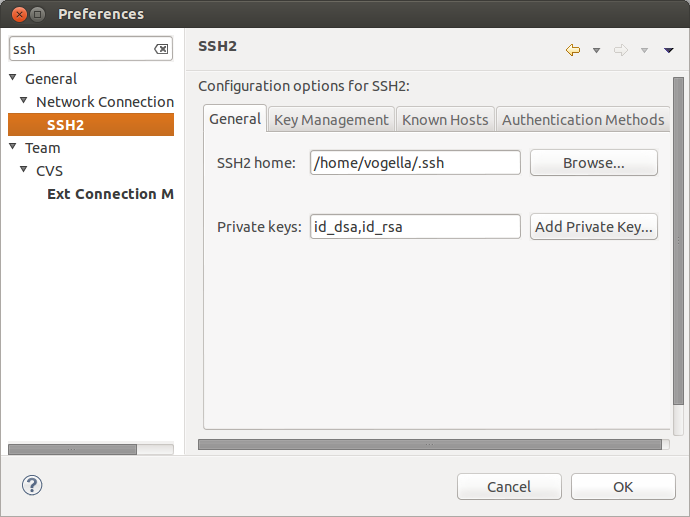
8.4. Eclipse support for SSH based authentication
Y'all can create an SSH key pair in Eclipse for SSH based communication. This can be washed via .
9. Details on the Git views
9.1. Using the Git Repositories view
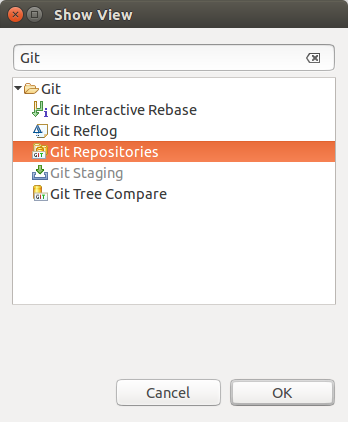
The Git Repositories view allows y'all to browse, add. initialize or clone repositories. Information technology as well allows to import projects, manage your branches and much more. Y'all can open this view via
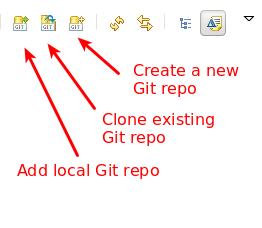
The toolbar permit you to:
-
add an existing local repository to the view
-
clone a repository
-
create a new repository
The content area of the Git Repositories view shows the existing Git repositories and the of import information of each repository. The following screenshot shows an example entry.
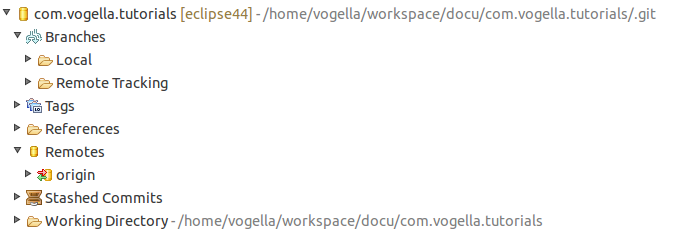
A correct-click (context menu) on an element in the Git repositories view allows you lot to perform related Git operations. For example, if you right-click on a branch you can checkout the branch or delete information technology.
9.2. Using the Git Staging view
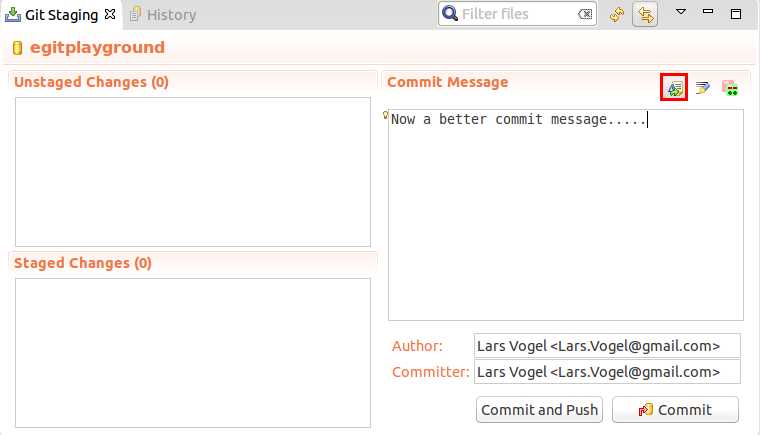
The Git Staging view allows staging and committing equally well as reverting changes.
This view presents which files you lot have touched and which files will be included in the adjacent commit. Unstaged Changes lists those changes which you have done locally only which you have not yet added to the staging area. Staged Changes list those changes which you already have added to the staging area. You lot can drag and driblet files from ane expanse to the other. To commit the staged changes yous write your commit message and press the Commit push which is highlighted in the following screenshot.
You can switch between different repositories or even restart Eclipse without losing a commit bulletin and information technology allows incremental staging for changes.
You lot can open the Git Staging view via the menu.
nine.three. Git integration into the Packet and the Project Explorer
The Package Explorer view shows indicators on the files to show their status. The most important icon decorators are depicted in the following screenshot.
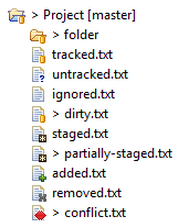
The file proper name describes the state of the file from the following table:
| Country | Description |
|---|---|
| tracked | File is committed to the Git repository and has not changed. |
| untracked | File is neither staged nor committed. |
| ignored | File is flagged to exist ignored by Git operations. |
| dingy | File has inverse since the last commit. |
| staged | Changes in the file volition be included in the next commit. |
| partially-staged | The resource has changes which are added to the alphabetize and additional unstaged changes in the working tree |
| added | Staged just not yet committed, i.e. snapshot of this file has been stored in the git database. This status is the same as the staged status, but the file wasn't under Git version control before. |
| removed | The resources is staged for removal from the Git repository. |
| conflict | A merge disharmonize exists for the file. |
A combination of the staged and muddy condition means: some parts of the changed file take been staged while some are notwithstanding unstaged. This can happen if you stage a file and then again modify the file earlier creating the next commit. You can as well change the staged parts using the compare editor opened by double clicking files in the staging view.
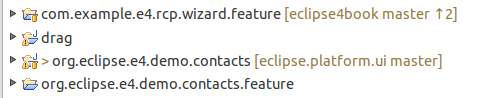
On a project level the explorer view adds the data which Git repository is used to the project name. It also adds the number of commits that are different between local and remote tracking branch. This style you lot can quickly come across if your local branch is ahead or backside the remote branch it is tracking.
9.4. Using the History view for viewing the Git history
9.iv.1. Purpose of the history view
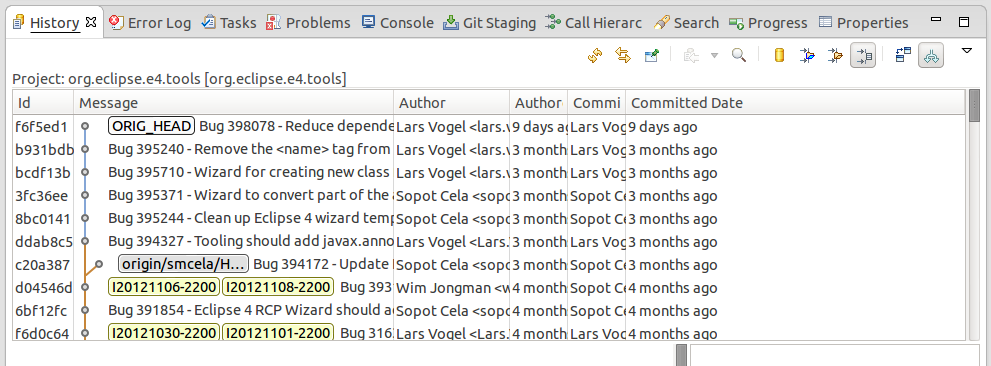
The History view allows you to analyze the history of your Git repository and to encounter to which commits the branches and tags points. This view displays author, appointment, commit message and the modified files of a commits.
This view is depicted in the following screenshot.
You can open this view via . Alternatively you can open up information technology via the repository node in the Git Repositories view. For this click on the entry. Some views, e.g., in the Java EE-Perspective, do not accept this shortcut, in this example use .
To come across the history of a resources, select your projection, a file or a folder, right-click on information technology and select the Evidence in> History context menu entry. Alternative yous can use the Alt+Shift+West shortcut and select the History entry.
Yous tin can likewise configure the History view to display the history of the electric current selection. Select the highlighted button in the following screenshot for that.

If y'all select a commit y'all see the commit message and the involved files.
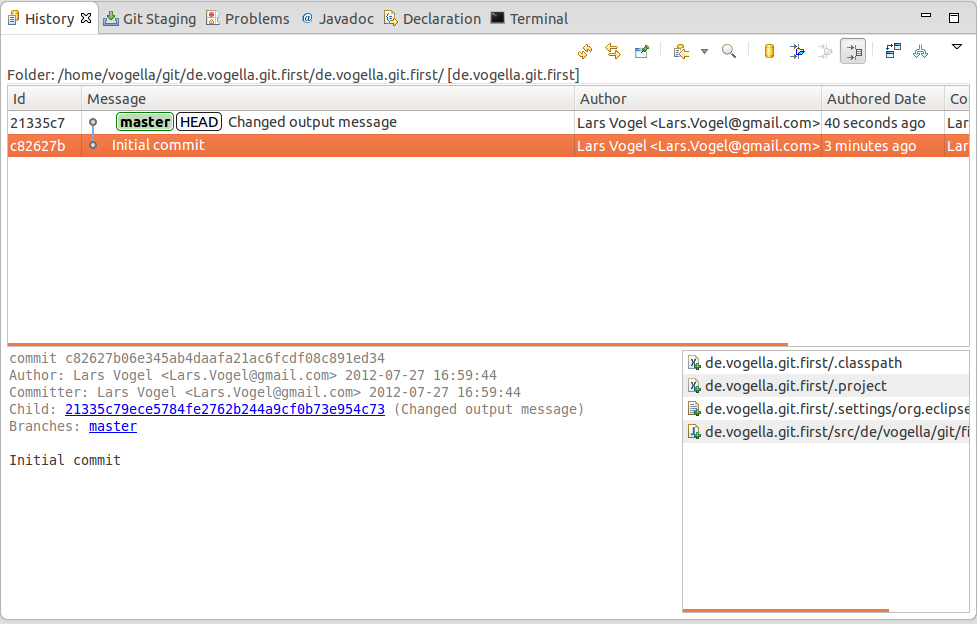
Via right-click on an private file you can compare this file with its ancestor (the commit before that) or with the current version in the workspace.
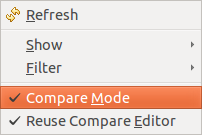
| If the "compare manner" toggle is selected from the view menu of the History view y'all tin can also double click a file to compare it to the previous version. |
ix.4.2. The History view filters
The History view has quite some options to configure which commits are displayed. Its toolbar allows yous to customize which commits are displayed. By default, the History view filters the history based on the current selection and shows only the active co-operative.
If y'all piece of work with several branches, e.thou., because you are using Gerrit for code reviews, you lot typically want to see all branch data and remove the filter based on the resource.
The History view allows you to filter based on resource. See the tooltips of the toolbar for the meaning of the different filter options. In order to see all commits click the highlighted buttons with the Testify all changes in this repository and Bear witness all branches and tags tooltips.

The following listing gives an overview of the purpose of the unlike buttons.

Depending on your use example you may want to select the following option:
-
show but those commits which are reachable from the current branch. Hide all commits on other topic branches.
-
encounter merely those commits which inverse the selected resources (file, project, subfolder) or it's children. E.g. brandish only those commits which touched the selected java file. The electric current selection is shown in the top right corner of the History view.
-
run into simply those commits which inverse anything in the parent folder of the selected resource (file, project, subfolder) or it's children. E.g. display only those commits which changed the aforementioned package equally the selected coffee source.
-
run across only those commits which changed anything in the aforementioned project every bit the selected resources or it'south children. Used when you are working in a repository which contains multiple projects.
-
don't filter at all. Show all commits of the electric current repository
The options b., c. and d. are tied to the currently selected resource. Push yard. allows that the history view automatically updates when you change the selection.
| If you got lost with the different filters and the history doesn't show what yous look, gear up it back to show everything. Therefore make sure that Testify all branches and tags (a) is turned on and Show all changes in repository (e) is selected. |
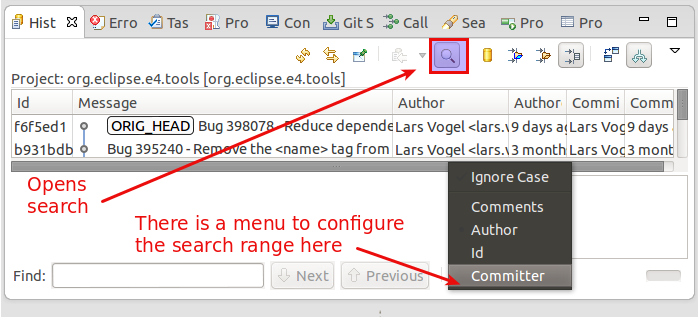
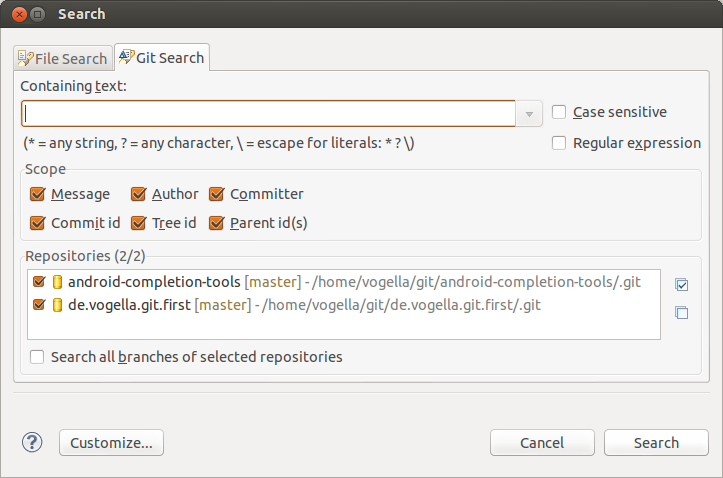
9.4.3. Using search
Y'all tin can likewise search for commits based on committer, author, ID or annotate. For this turn on the Prove Find toolbar (f) and type in a search string in the Detect field. The commits fitting to your search are highlighted. You tin combine this search with the filters explained in a higher place.
| The Git Search available in the menu is much more powerful and consumes less memory since it doesn't demand to also display the history. |
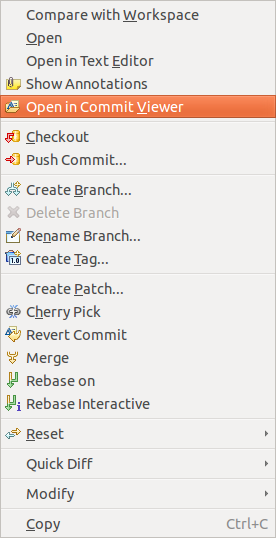
nine.4.4. Showing details of a commit
If you want to run into more details about a commit, right-click it and select the Open in Commit Viewer entry.
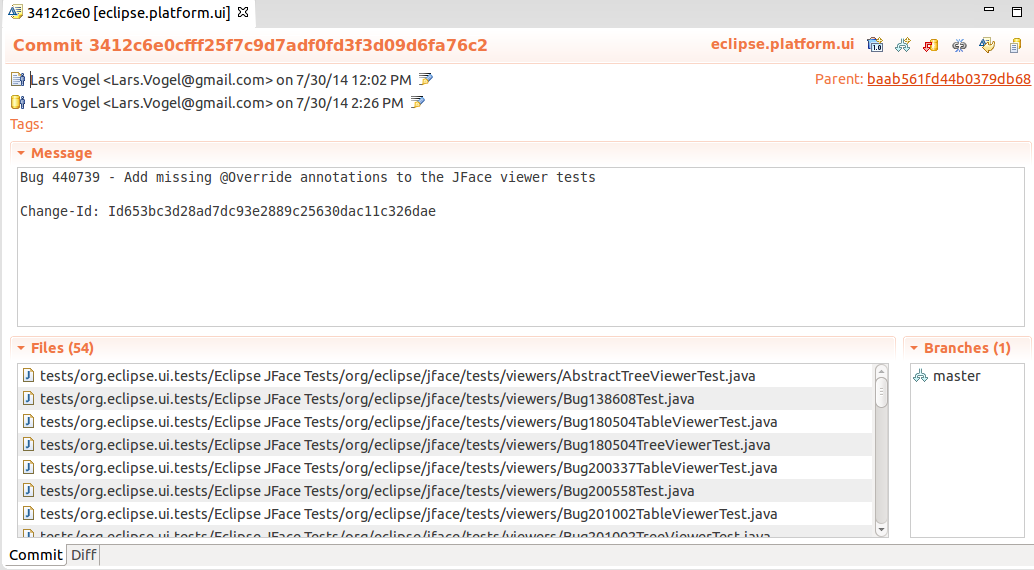
nine.5. Commit Viewer
The Eclipse IDE allows to view the content of a commit. For instance,if you lot are in the Git repositories view yous can open up a commit via the chief Eclipse carte. To practise this select the menu entry.
If y'all open a commit you can create a tag or co-operative from information technology. You can likewise revert it, cherry pick it or check information technology out. Y'all tin as well reveal it in the history view.

ten. Performing Git operations in Eclipse
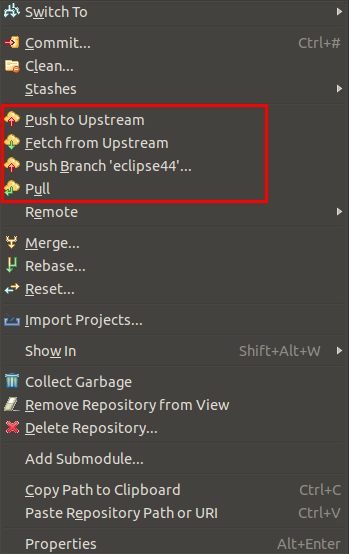
10.i. Pull, push and fetch
You tin apply the Git Repositories view to pull, push and fetch to remote repositories. Right click on your repository and select the appropriated functioning.
10.2. Basic team operations
Once you lot take placed a projection under version control you can first using team operations on your projection. The team operations are available via right-click on your project or file.
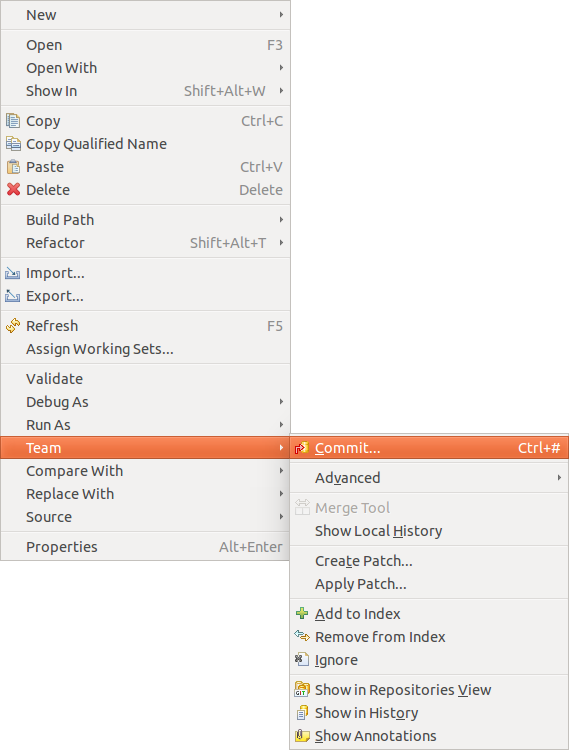
| The Team bill of fare is too available from the context carte du jour of an opened editor. |
The most of import operations are described in the following listing. Select:
-
, to add together the selected resource(s) to the Git index
-
, to open the commit dialog to create a new commit
-
, to create a patch
-
, to apply a patch to your file system
-
, to add a file to the .gitignore file
-
, to brandish the history of the selected resource(s)
10.3. Team operations available on the project
If y'all select a project you lot can employ boosted squad operations from the context menu.
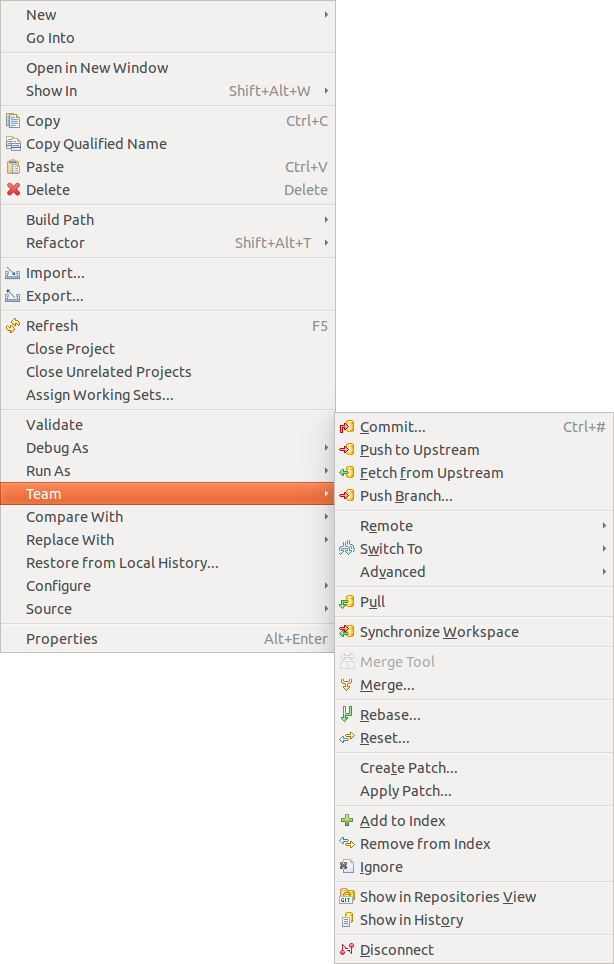
-
to pull in changes from your remote Git repository
-
to fetch the current state from the remote repository
-
to checkout existing or create new branches
-
to button changes to your remote Git repository
-
to create and manage tags.
10.4. Amending a commit
Git amend allows adjusting the final commit. For case you can change the commit message or add another modification.
The Git Staging view allows y'all to perform the Git amend command via the highlighted button in the following screenshot.
10.5. Creating and switching branches in Eclipse
Right-click your projection and select to create new branches or to switch between existing branches.
You tin can besides switch branches in the History view or the Git repositories view.
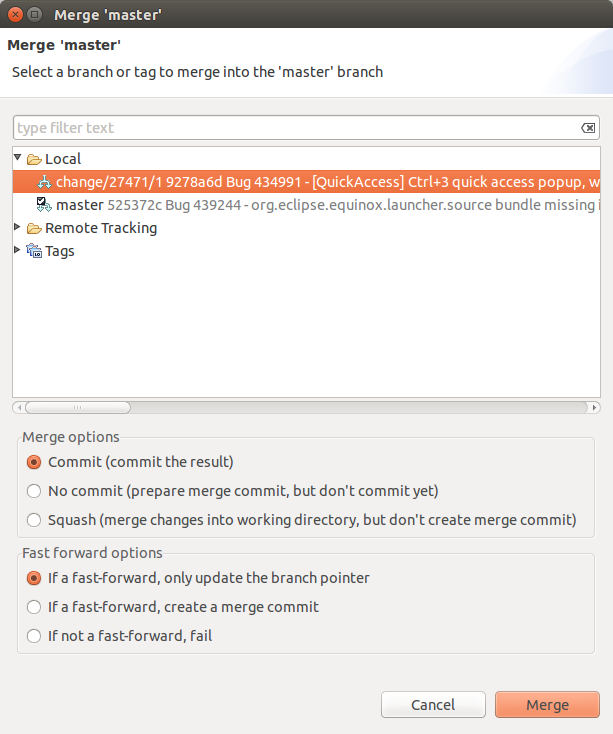
10.six. Starting a merge functioning in Eclipse
Eclipse supports merging of branches to add the changes committed on one branch into another co-operative.
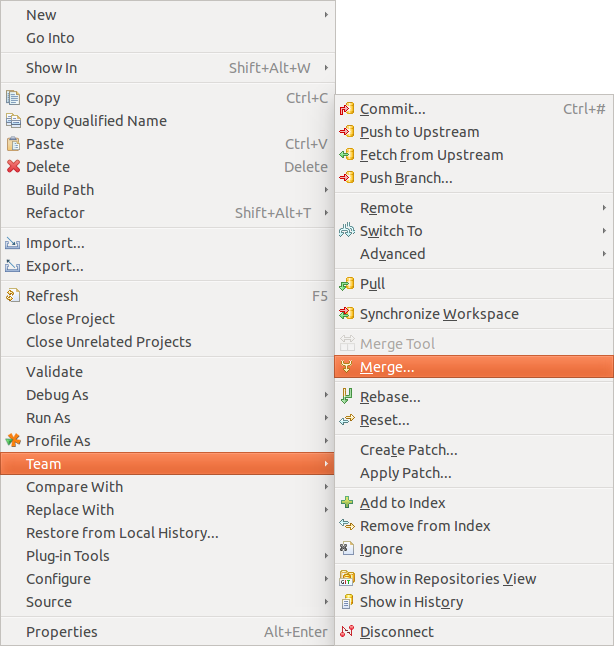
Checkout the branch into which you want to merge the changes into and select your projection and to outset the merge dialog.
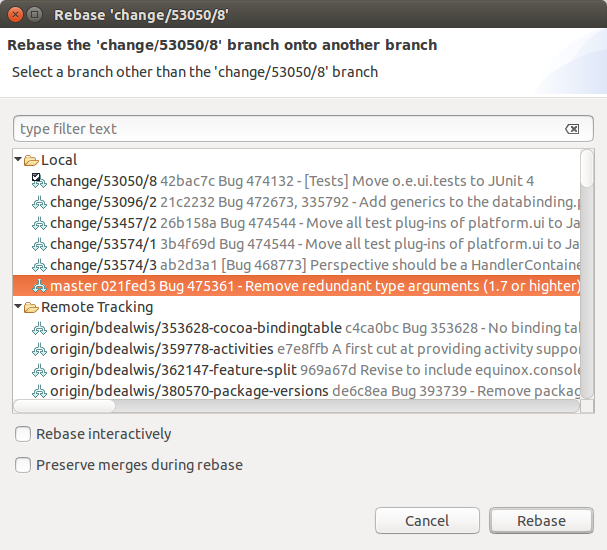
10.7. Rebasing a branch onto another branch
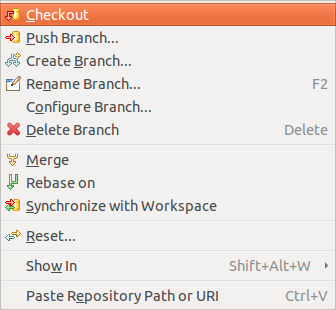
The Git Repositories view allows you lot to rebase your currently checkout co-operative onto some other branch.
Right-click on a repository node and select equally depicted in the following screenshot.
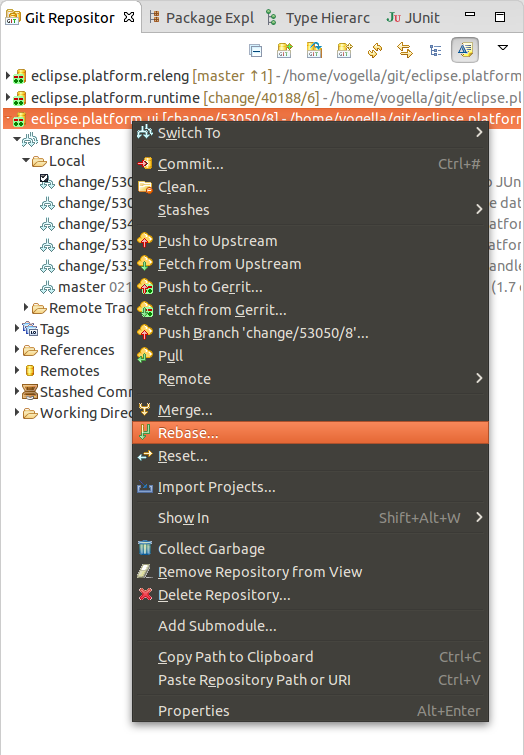
In the post-obit dialog you lot tin select the branch onto which you want to rebase.
| Y'all tin also select the co-operative to rebase onto from the Branches node of the tree directly. |
If the rebase was successful a dialog is shown. You have to resolve rebase conflicts if they occur. Subsequently resolving them, select .
If you want to skip the conflicting commit and continue with the rebase operation use .
To abolish the rebase operation select .
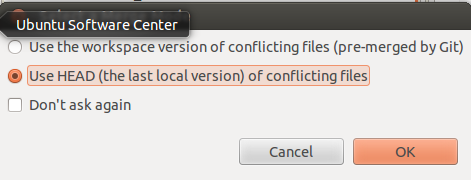
10.8. Solving conflicts created by merge, rebase or other operations
If during a Git operation, 2 changes are conflicting, you lot have to solve these conflicts manually. Eclipse highlights the affected files in the Bundle Explorer and Projection Explorer view.
Eclipse Git supports the resolution of these merge conflicts.
To trigger this via the explorer views, right-click on a file with merge conflicts and select .
You can likewise apply the Git staging view to find the conflicting files. In large projects this is ordinarily faster than navigating the Packet Explorer or Project Explorer view.
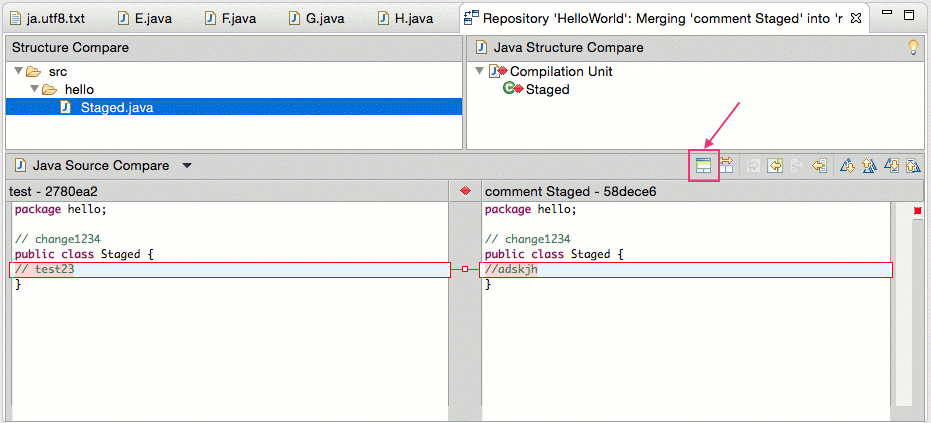
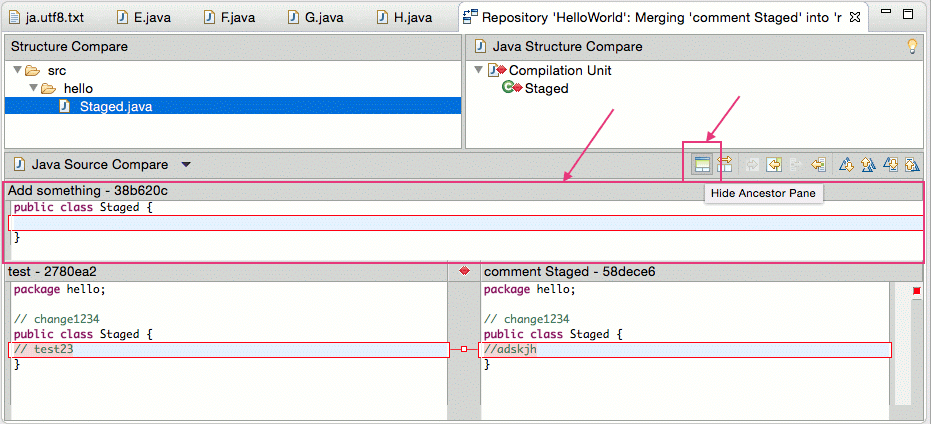
This opens a dialog, asking you which merge way you would like to use. The easiest way to come across the conflicting changes is to use the Use Caput (the last local version) of alien files as merge way. This fashion you come across the original changes on the left side and the conflicting and non-conflicting changes on the right side.
You tin can manually edit the text on the left side or use the Re-create current change from right to left button to copy the changes from right to left.


Eclipse besides allows to show the common antecedent of both commits to make the merge easier. Press the Hibernate/Show Ancestor Pane push button for that. This is demonstrated by the following screenshots.
In one case you have manually merged the changes, select from the context menu of the resource to mark the conflicts as resolved and commit the merge commit via .
x.nine. Git reset and Git reflog
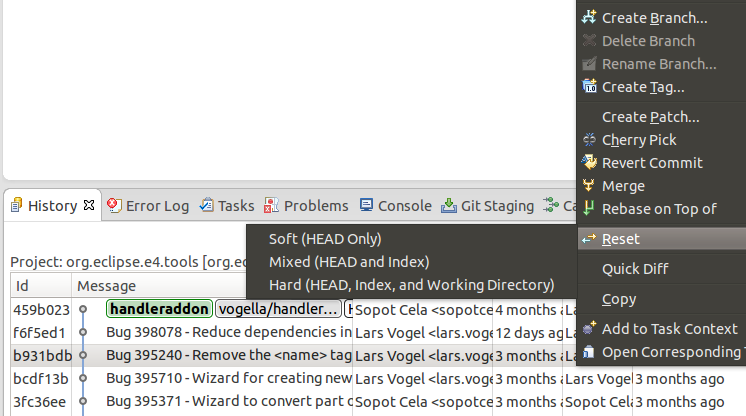
The History view allows y'all to reset your electric current branch to a commit. Correct-click on a certain commit and select and the reset mode you would like to employ.
ten.10. Finding "invisible" commits with the Reflog view
Commits are not visible in the Git history if they tin can't be reached from a branch or tag. This might happen during a reset, commit amend or rebase performance. Past default, such invisible commits are removed after ii weeks past the Git organisation.
The Git Reflog view keeps runway of the movements of the HEAD pointer and the movements of each branch. This view allows yous to notice a commit again, e.g., if y'all used the git reset --hard command to remove certain commits.
10.eleven. Selecting individual commits via git blood-red-option
In the History view, you tin can cherry-pick a commit via the context menu. Scarlet-pick allows to move selected changes describes by a commit to some other branch. You tin can too use information technology in combination with a Git reset to perform a simplified interactive rebase.
Lets presume the post-obit situation, in which you would similar to remove the "Bad commit" from the history described past the master co-operative.
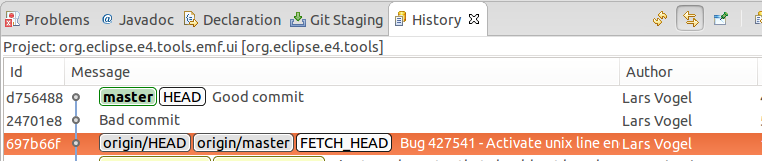
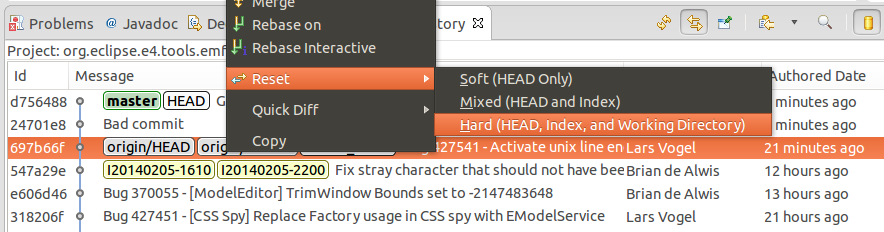
You lot could start with a difficult reset of the co-operative to origin/main. This will motion the principal branch pointer to the commit described past origin/master. The Expert and the bad commit are not reachable anymore by the main branch.
To re-utilize the changes by the "Proficient commit", scarlet-pick the good commit.
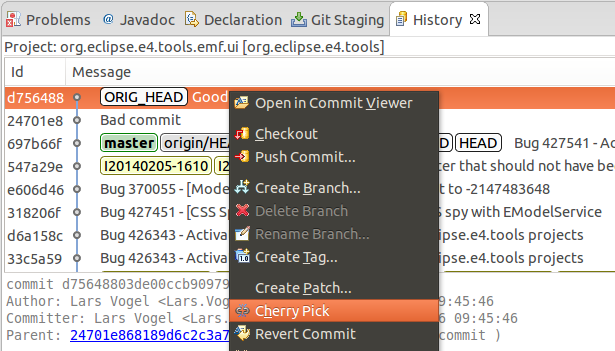
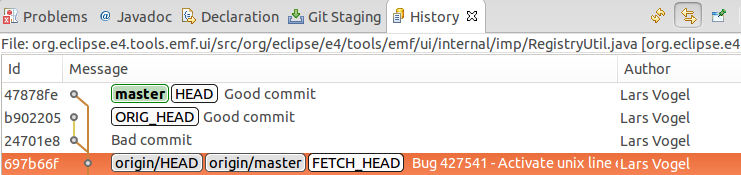
This results in a history without the bad commit.
x.12. Comparing and replacing files based on the Git history
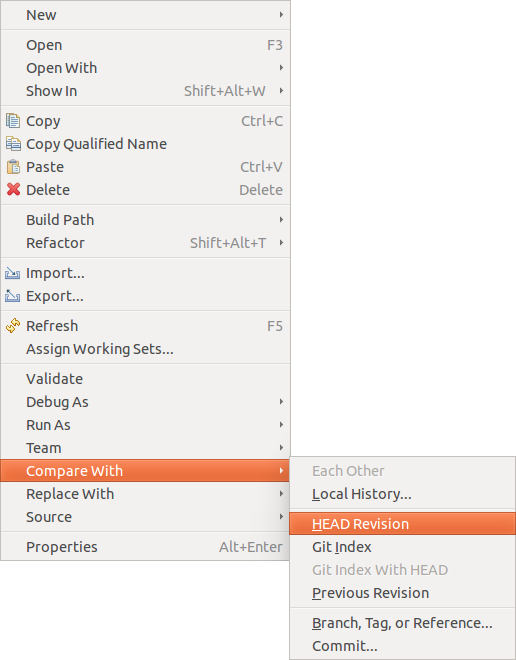
x.12.one. Comparing files
Eclipse Git allows you to compare a selected file, folder or projection with another commit or with the Git alphabetize. Utilize to open up the menu. Later select with what yous want to compare. The HEAD Revision selection is depicted in the following screenshot.
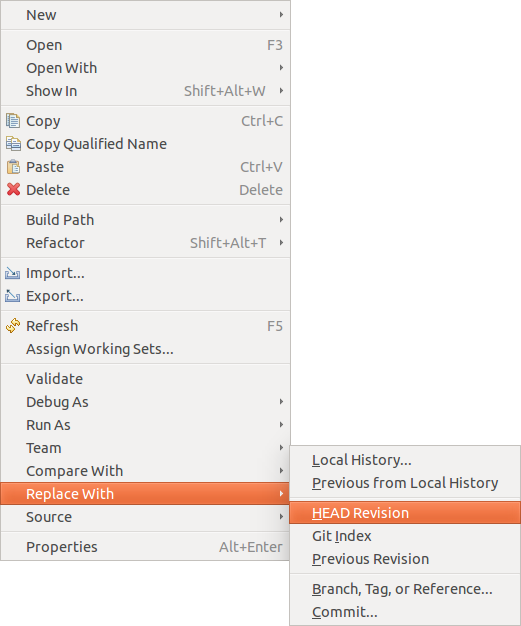
x.12.2. Replacing files
The carte entry allows you to supercede the current selection with the version contained in the selected commit or the Git index.
xi. Meet Git data line by line (aka git blame)
Eclipse allows to display the information which commit and person change a line. To enable this, correct-click on your file and select .
| This action is also available via the line ruler in most editors. |
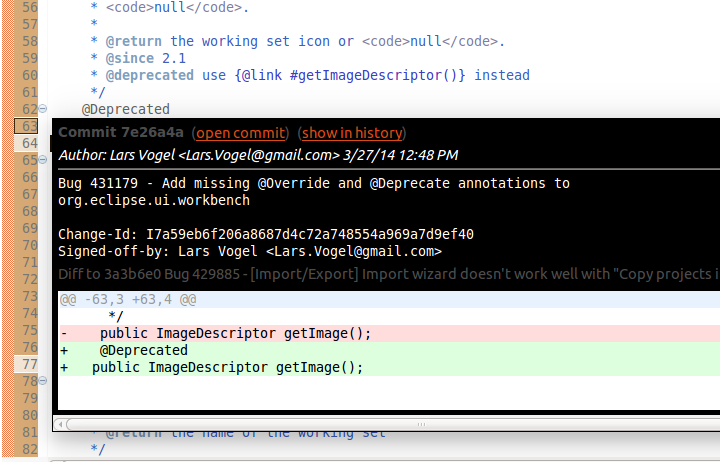
Afterward, you can place the mouse on the left side of the editor. A popup dialog shows the commit data and the change applied by the shown commit.
| To ignore whitespace changes in the Git blame annotations in Eclipse, select and select Ignore whitespace changes. |
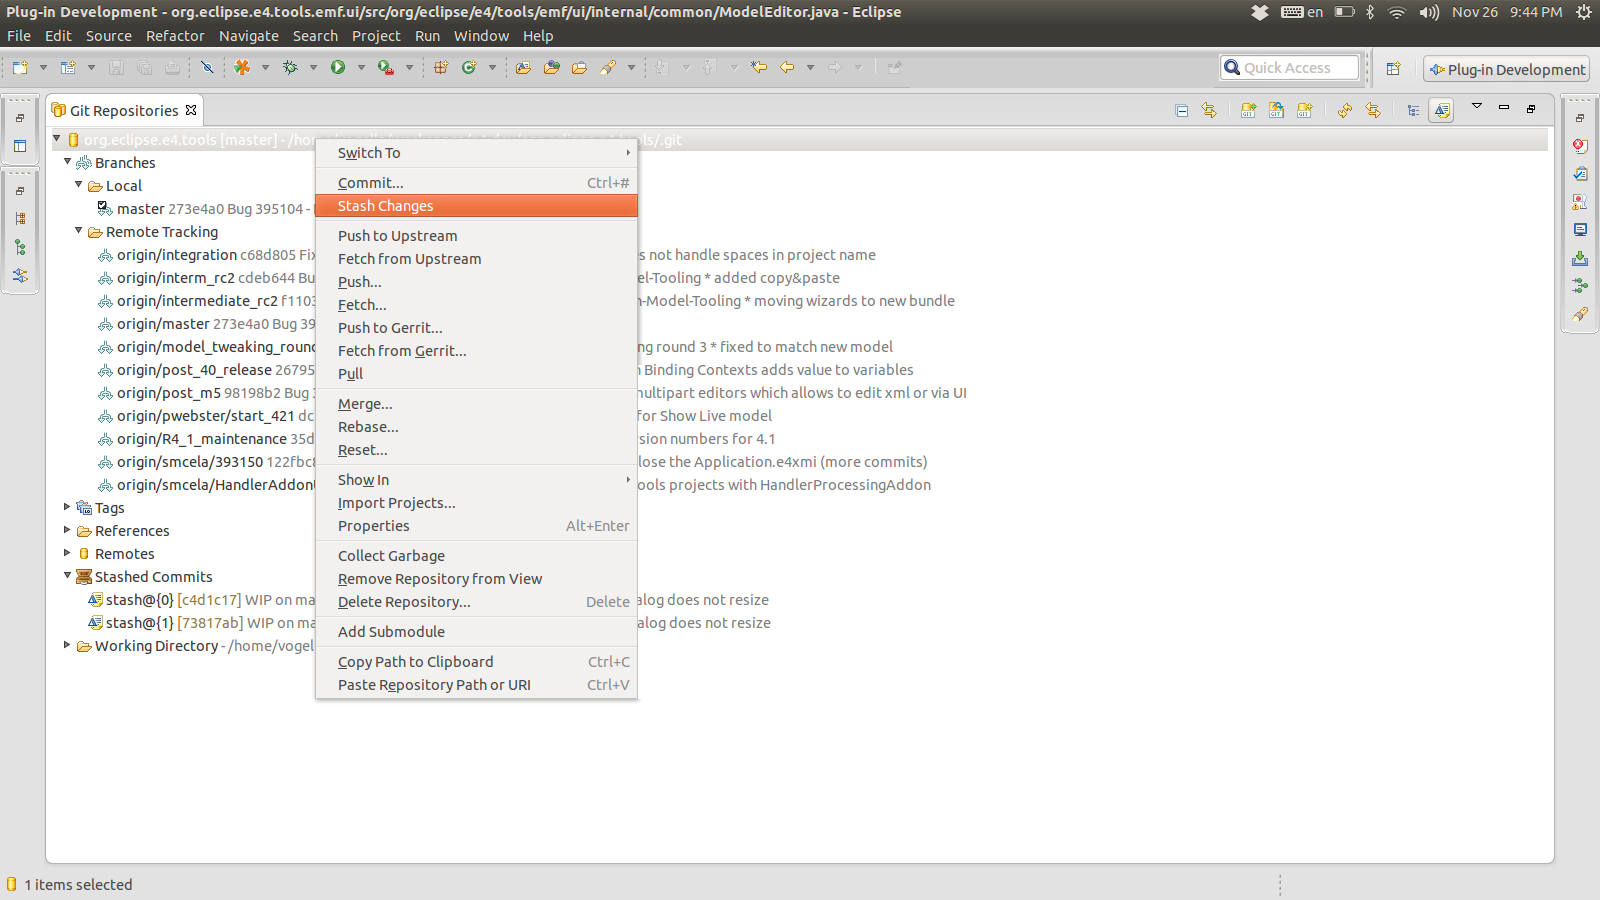
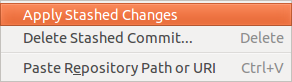
11.1. Stash via the Git repository view
The git stash command is bachelor in the Git repositories view. Right-click on your Git repository and select Stash Changes.

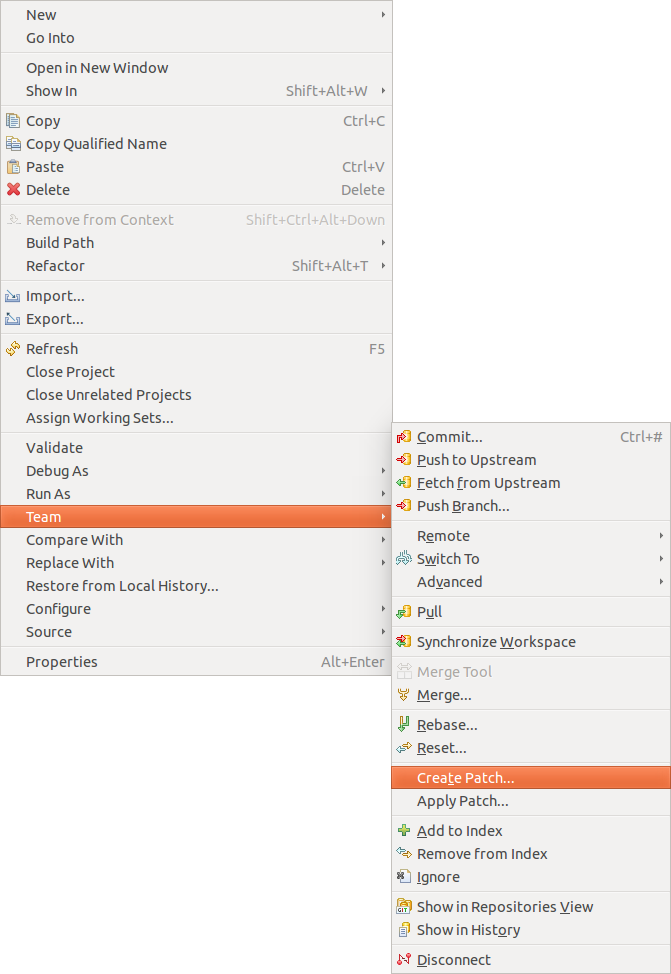
11.two. Creating patches
To create a patch for a set of changes with Eclipse, select the resources for which you lot want to create a patch in the Bundle Explorer view. Now, correct click and select .
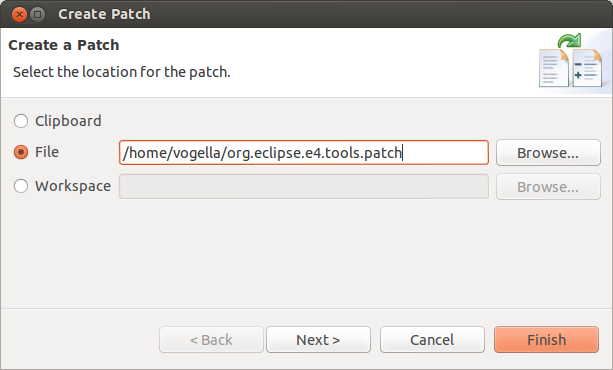
The resulting file can exist used to get applied to another Git repository, via . Yous can as well apply the patch on a organisation where Git isn't installed at all, i.e., you don't demand a Git repository to utilize a patch.
12. Using Eclipse Git with GitHub
12.1. Clone project
Copy the URL from GitHub and select in Eclipse from the menu the
Eclipse fills out most of the fields based on the URL in the clipboard. Enter your user and countersign to be able to push to GitHub. Alternative you can too employ an SSH key. You can configure Eclipse to know your SSH via the preference setting. This setting is depicted in the following screenshot.
12.two. Button changes
After you fabricated changes and committed them to your local repository, you can select on the project folder, to push your changes to your GitHub. This requires write admission to the GitHub repository.
13. Writing adept commit messages
xiii.i. Importance of Git commit messages
A commit adds a new version to the repository. This version is described by a commit bulletin.
The commit message describes the changes recorded in a commit. It should help the user to sympathize the history of the repository.
A commit message should therefore be descriptive and informative without repeating the code changes.
13.2. Guidelines for useful commit messages
A commit bulletin should take a header and a body. The header should be less than 50 with a maximum of 72 characters. The body should wrap its text at 72. The trunk is separated from the header by an empty line.
This ensures that the commit message is displayed well on the control line or in graphical tools.
The trunk describes the reason why the modify was made. The changes in the file can be reviewed with the help of Git.
The commit bulletin should be in present tense, e.g., "Adds meliorate mistake handling" instead of "Added improve error treatment".
The last paragraph tin as well contain metadata as fundamental-value pairs. This data is besides referred to as the commit message footer.
This metadata can be used to trigger a certain beliefs. For example, the Gerrit lawmaking review system uses the Change-Id central followed past a change-id. This changed id is used to place to which review the message belongs.
The commit message footer can as well have e.g., 'Signed-off-by'. Or information technology may link to a issues tracking organization, e.g., 'Bug: 1234'.
13.iii. Example bulletin
The post-obit can serve as an example for a commit bulletin.
Brusque summary (less than fifty characters) Detailed explanation, if required, line break at effectually 72 characters more stuff to describe... Fixes: bug #8009 Change-Id: I26b5f96ccb7b2293dc9b7a5cba0760294afba9fd 13.4. Good and bad example for a Git history
The following listing shows the output of the git log --oneline command of a Git repository with bad commit letters. The get-go value in each line is the shortened SHA-one, the second the commit message. This history is non useful.
21a8456 update 29f4219 update 016c696 update 29bc541 update 740a130 initial commit The next listing shows the history of another Git repository in which amend commit messages accept been used. This history already gives a proficient overview about the activities.
7455823 Adds search and filter to the model editor tree 9a84a8a Missing DynamicMenuContribution in child selector 952e014 Fixes spelling error in Toolbar/Add together child 71eeea9 Adds choice to import model elements from legacy RCP 123672c New Awarding wizard is missing dependencies 97cdb9a Creates an id for handlers The above example also adds the corresponding bug number to the commit message. Some teams (like the Eclipse platform team) use this approach, others adopt to add the bug number to the commit messages.
xiv. Contributing to EGit - Getting the source lawmaking
This back up is provided past the EGit project via a set of plug-ins (software component).
Eclipse uses the JGit library to perform the Git commands. JGit is a library which implements the Git functionality in Java.
EGit is hosted on git://git.eclipse.org.
How to Clone Git Repository in Eclipse
Posted by: eppersonthadjuse.blogspot.com
0 Response to "How to Clone Git Repository in Eclipse"
Post a Comment